
In this post, I want to focus on the fleet simulator’s structure and how to develop it efficiently. My post will primarily revolve around Docker and its integration with VSCode. I’ll also describe how I set up tmux for working from the console.
Global Structure
Firstly, the project is hosted here on GitHub. It’s a single repository, despite containing multiple sub-projects. I could’ve used git submodules for this, but in my opinion, the added complexity isn’t worth the potential benefits.
The top-level structure looks like this:
1
2
3
4
5
6
./fleet-sim/
├── docker/
├── robot/
├── sim_server/
├── Makefile
└── README.md
Each folder represents a specific sub-project, while the Makefile contains commands that are frequently used. The README.md is there for the project description.
docker
This folder holds everything related to Docker containers. It contains Dockerfiles that define image building, the content that needs to be copied into the image (mainly configs), and a directory for persistent data that needs to be retained even if a container is recreated, such as downloaded models or console history files.
robot
Here lies the source code for the robot ROS packages, including .launch files, configs, maps, xacro files, and models. There’s also a .devcontainer.json file, which VSCode uses to load extensions needed for development.
sim_server
Similar to the robot folder, this one contains source codes related to the Gazebo simulation server, mainly the plugins for exchanging data between the Gazebo model and the ROS robot backend.
Makefile
The Makefile serves as a set of aliases for the most common Docker commands.
- up - Starts all containers
- down - Stops all containers
- up-robot - Starts the robot container
- up-sim - Starts the simulation container
- build-robot - Builds the robot container
- build-sim - Builds the simulation container
- attach-robot - Attaches to the zsh console of the robot
- attach-sim - Attaches to the zsh console of the simulator
Docker Container for Robot
In a previous post, I mentioned that each robot would run its logic inside a Docker container, providing excellent encapsulation. Moreover, Docker containers are an excellent tool for development because they allow you to develop in a sandboxed environment, keeping the host system unaffected. This is really handy, as development involves installing many libraries and tools that could easily interfere with the host system or other projects.
Dockerfile
The Docker image is built using the docker/robot/Dockerfile file.
1
FROM ros:noetic-robot
ROS images are usually divided into several categories, each built upon the previous one with some additions. For ROS Noetic, it looks like this: ros-core -> ros-base -> robot -> desktop. I’m using noetic-robot to avoid bloating the image too much.
1
2
3
4
5
6
7
8
9
10
11
12
13
14
15
16
17
RUN set -eux && apt update \
    && apt install -y --no-install-recommends \
      curl \
      git \
      htop \
      iproute2 \
      iputils-ping \
      less \
      mc \
      openssh-server \
      rsync \
      sudo \
      tmux \
      vim \
      xsel \
      zsh \
    && rm -rf /var/lib/apt/lists/*
The next section just installs some useful tools that will be needed for development.
1
2
3
4
RUN set -eux && apt update \
    && apt install -y --no-install-recommends \
        ros-noetic-gazebo-ros \
    && rm -rf /var/lib/apt/lists/*
Even though I don’t plan to use Gazebo in the robot container, I’m going to install it to check if the robot is working properly.
1
2
3
4
5
6
7
8
9
10
11
12
13
14
15
RUN set -eux && apt update \
    && apt install -y --no-install-recommends \
        ros-noetic-gmapping \
        ros-noetic-dwa-local-planner \
        ros-noetic-rviz \
        ros-noetic-joint-state-publisher-gui \
        ros-noetic-gazebo-ros-pkgs \
        ros-noetic-gazebo-ros-control \
        ros-noetic-navigation \
        ros-noetic-teleop-twist-keyboard \
        ros-noetic-gmapping \
        ros-noetic-map-server \
        ros-noetic-rqt \
        ros-noetic-rqt-common-plugins \
    && rm -rf /var/lib/apt/lists/*
Here, additional ROS packages that will be used by the robot are installed.
1
2
3
4
5
6
7
8
ENV USER developer
ENV HOME /home/developer
SHELL ["/bin/bash", "-c"]

RUN set -eux \
    && (useradd -m $USER && yes developer | passwd $USER) \
    && usermod -aG sudo $USER \
    && echo '%sudo ALL=(ALL) NOPASSWD:ALL' >> /etc/sudoers.d/$USER
This creates a user named developer with no password required for sudo commands. It’s extremely handy not to be prompted for a password every time I type sudo.
1
2
3
4
RUN git clone https://github.com/ohmyzsh/ohmyzsh.git $HOME/.oh-my-zsh && \
    cp $HOME/.oh-my-zsh/templates/zshrc.zsh-template $HOME/.zshrc && \
    sudo chsh -s $(which zsh) developer
RUN echo 'source /opt/ros/noetic/setup.zsh' >> $HOME/.zshrc
I will use zsh with the oh-my-zsh configuration framework. ROS is also adjusted to use zsh, and they provide a setup.zsh that needs to be sourced. I’ll put it into .zshrc to be executed every time zsh is invoked.
1
2
3
4
5
6
7
8
RUN git clone https://github.com/tmux-plugins/tpm $HOME/.tmux/plugins/tpm && \
    git clone https://github.com/tmux-plugins/tmux-sensible $HOME/.tmux/plugins/tmux-sensible && \
    git clone https://github.com/tmux-plugins/tmux-yank $HOME/.tmux/plugins/tmux-yank && \
    git clone https://github.com/tmux-plugins/tmux-cpu $HOME/.tmux/plugins/tmux-cpu

COPY content/tmux.conf $HOME/.tmux.conf
COPY content/start_tmux_session.sh $HOME/start_tmux_session.sh
RUN chmod +x $HOME/start_tmux_session.sh
tmux, also known as a terminal multiplexer, is a tool that allows running multiple terminals within a single window. For ROS development, it’s common to have many terminals open, so tmux is invaluable for managing them. This step installs tmux plugins and sets the default configuration, along with a script for initiating a tmux session.
1
2
3
4
5
6
7
8
9
RUN set -eux \
    && mkdir -p $HOME/catkin_ws \
    && chown -R $USER:$USER $HOME

WORKDIR $HOME

COPY content/entrypoint.sh /entrypoint.sh
ENTRYPOINT ["/entrypoint.sh"]
CMD ["/home/developer/start_tmux_session.sh"]
Finally, the catkin_ws directory is created, and the ownership of the entire HOME directory is changed to the default user. It’s advantageous to create this folders now because if they are created as a result of mounting, they end up owned by root. The next step involves setting up the entrypoint.sh script, and the final command to be executed when the Docker container starts, which in this case is the start_tmux_session.sh script to prepare the tmux session.
docker-compose
Docker is primarily used from the command line with the docker command. This command is utilized for all operations with Docker images, containers, networks, etc. All parameters need to be passed into the command, which can become lengthy and unwieldy. Consequently, bash scripts are often created to handle this. However, there’s a better tool for managing Docker containers called docker-compose. It was initially created to orchestrate multiple Docker containers, but I believe it adds value even for a single container. The main input for docker-compose is the docker-compose.yaml file, which for this project is located here: docker/docker-compose.yaml. This YAML file contains all the necessary information to build an image, create a container, or establish a network.
1
2
3
4
5
6
7
8
9
10
11
12
13
14
15
16
17
18
19
20
21
22
23
24
25
26
27
28
29
30
31
32
33
34
35
36
37
38
39
40
41
42
43
44
45
46
47
48
49
50
version: '3'
services:
  robot:
    build:
      context: ../docker/robot/
      dockerfile: Dockerfile

    image: "elanius/robot:dev"
    container_name: ${ROBOT_CONTAINER_NAME}
    runtime: nvidia
    user: developer
    privileged: true
    cap_add:
      - NET_ADMIN
      - NET_RAW
    volumes:
      - /tmp/.X11-unix:/tmp/.X11-unix
      - ../robot:/home/developer/catkin_ws
      - ./robot/permanent/.gazebo:/home/developer/.gazebo:delegated
      - ./robot/permanent/.zsh_history:/home/developer/.zsh_history:delegated
      - /etc/timezone:/etc/timezone:ro
      - /etc/localtime:/etc/localtime:ro
    environment:
      - NVIDIA_VISIBLE_DEVICES=all
      - NVIDIA_DRIVER_CAPABILITIES=all
      - DISPLAY
      - QT_X11_NO_MITSHM=1
      - SHELL=/usr/bin/zsh
      - GAZEBO_MASTER_URI=http://192.168.40.100:11345
      - CONTAINER_NAME=${ROBOT_CONTAINER_NAME}
      - TERM=screen-256color
    networks:
      fleet_sim_network:
        ipv4_address: 192.168.40.101
    stdin_open: true
    tty: true

  networks:
      fleet_sim_network:
        ipv4_address: 192.168.40.100
    stdin_open: true
    tty: true

networks:
  fleet_sim_network:
    ipam:
      driver: default
      config:
        - subnet: "192.168.40.0/24"
The services section defines the containers that will be created. For now, there is just one service called robot, which is composed of various fields. Let’s break it down:
- build: Contains information needed for building the Docker image.
- image: The name and tag of the image used to create the container.
- container_name: The name for the created container. It uses the
ROBOT_CONTAINER_NAMEenvironment variable defined in the.envfile. - runtime: This enables GPU support, which is important for running GUI applications such as RViz or Gazebo.
- user: The user that is used to run the container.
- privileged: Set to true, meaning that the container has access to all devices on the host.
- cap_add: Added capabilities, mainly for network administration tasks.
- volumes: A list of folders that are mounted into the container.
- catkin_ws: The source code is mounted into the catkin_ws folder.
- .gazebo: Contains Gazebo models. It takes time for Gazebo to download all models, so it’s mounted from a persistent folder to retain content during container restarts.
- .zsh_history: I often use the history of previously used commands, so it’s handy to keep it intact even if the container is recreated.
- environment: Here are the environment variables that will be set in the created container. They are mainly related to the terminal and shell.
- GAZEBO_MASTER_URI: Defines the IP address of the Gazebo simulation server.
- CONTAINER_NAME: The name of the container, which is shown in the tmux session.
- networks: Sets up the network. Connects to an internal network and assigns an IP address to the created container.
- stdin_open: Keeps stdin open even if nobody is attached to the container.
- tty: Enables an interactive container console.
- networks (at the top level): Defines a new network with a specific subnet range.
Finally, the Docker container is created with the command:
1
docker-compose -f docker/docker-compose.yaml up -d robot
But to make it even easier, I use Makefile aliases. In this case, it’s simply make up-robot.
Development in VSCode
Development is also carried out within a Docker container, where the entire environment is set up for it. This could be done directly in the container console with a text editor and compile commands. For some Vim experts, this might be convenient, but I don’t count myself among them. So, for me and the rest of us “normal” people, there’s VSCode. However, I don’t run VSCode directly from the container. Instead, I use a fantastic extension called Remote Development. This extension includes four sub-extensions dedicated to remote development. They all operate on a similar principle, which involves creating a VS Code server on the remote side—where compiling and commands are executed—and attaching a local VSCode instance to this server. It works really flawlessly, without any noticeable lags or the need for tweaks. The specific extension for development inside a container is called Dev Containers.
Another useful extension is for Docker management. I mainly use it as a browser to see which containers are up, or sometimes to start/stop a container. But it can do much more, such as performing some inspections of a container, viewing logs, or seeing the content of a container.
Once a container is created, it can be attached from VSCode. I usually do this with two VSCode instances. In one instance, I have the whole repository opened. In this instance, I use Git to create commits and manage Docker containers. Once I attach to the container, I do it in a new instance of VSCode, where I see only a specific sub-project. Thanks to the .devcontainer.json file located in the mounted folder, VSCode knows which extensions should be installed into the container.
This file, .devcontainer.json, can also be used in another way. If a sub-project folder is opened directly in VSCode, it detects this file and offers to run the current VSCode session inside the container. Based on the information in the file, it knows which container to start and attach to. It just shows a slightly different name for the attached container.
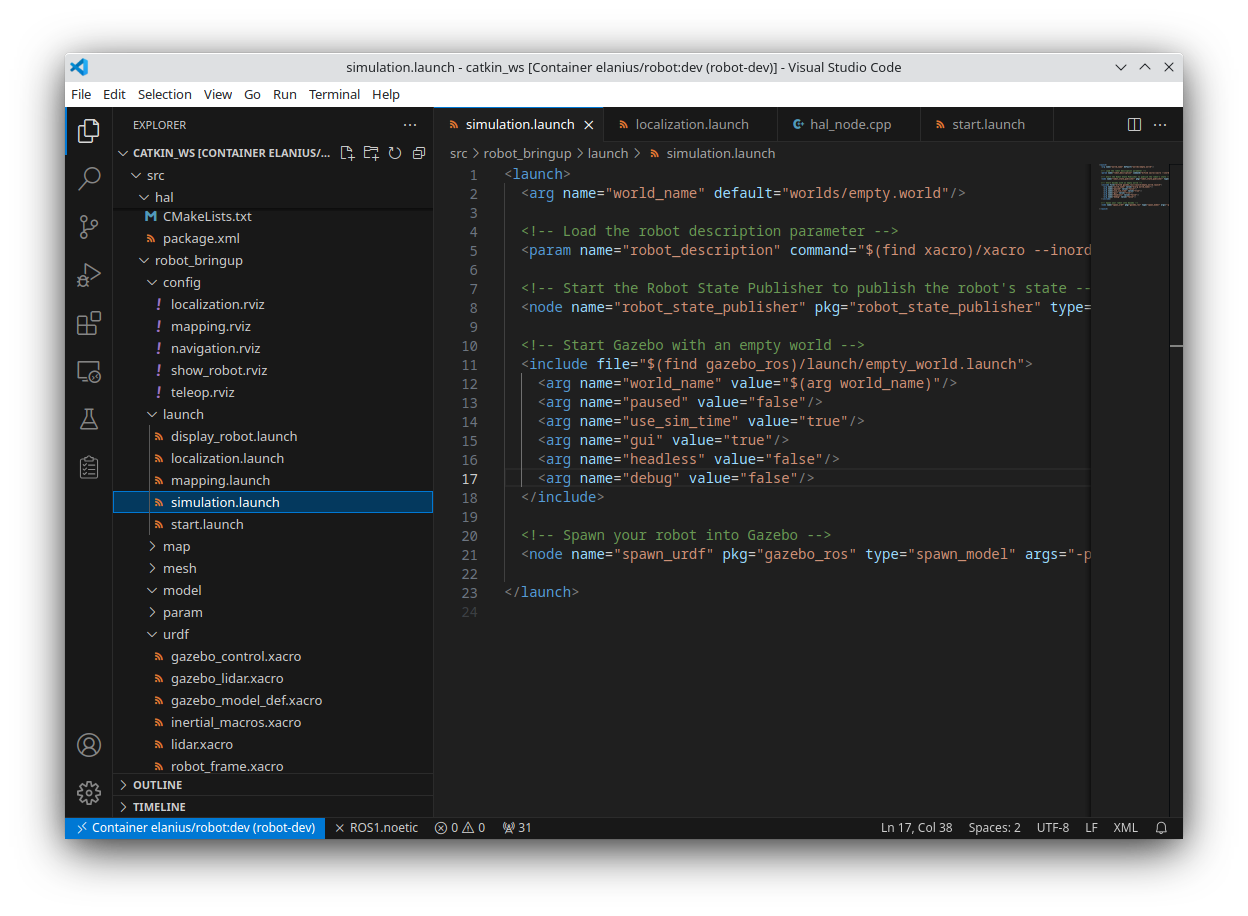 VSCode instance attached to a Docker container
Fixing setup.bash for VSCode
I mentioned that I didn’t need to make any tweaks using Dev Containers, but honestly, I had to make one adjustment. I’m not sure who to blame for it, but it seems to be a ROS-specific issue. The thing is, you always have to source the setup.bash or setup.zsh script and then run whatever IDE. If I just attach to the container, source setup.zsh, and then start VSCode, there wouldn’t be any problem. But once I attach to the container over VSCode, it’s too late to source setup.zsh. It can be done, but it will affect only the console where it was executed. But I need it to apply to the whole VSCode instance. So, what I did was to check what this script does and realized that it mainly sets some environment variables. I dumped all environment variables before and after the command and made a diff. From this diff, I knew exactly what was changed. And all these changed environment variables I set into tasks.json for the build task. Therefore, whenever I build ROS packages from VSCode, it works as if it was done in a sourced environment.
1
2
3
4
5
6
7
8
9
10
11
12
13
14
15
16
17
18
19
20
21
22
23
24
25
26
27
28
29
30
31
32
33
34
35
36
37
38
39
40
41
{
    "version": "2.0.0",
    "tasks": [
      {
        "label": "build",
        "type": "process",
        "options": {
          "cwd": "${workspaceFolder}",
          "env": {
            "ROS_DISTRO": "noetic",
            "ROS_ETC_DIR": "/opt/ros/noetic/etc/ros",
            "ROS_PACKAGE_PATH": "/opt/ros/noetic/share",
            "ROS_PYTHON_VERSION": "3",
            "ROS_VERSION": "1",
            "ROS_ROOT": "/opt/ros/noetic/share/ros",
            "ROS_MASTER_URI": "http: //localhost:11311",
            "ROSLISP_PACKAGE_DIRECTORIES": "",
            "PATH": "${env:PATH}:/opt/ros/noetic/bin",
            "LD_LIBRARY_PATH": "${env:LD_LIBRARY_PATH}:/opt/ros/noetic/lib:/opt/ros/noetic/lib/x86_64-linux-gnu",
            "CMAKE_PREFIX_PATH": "/opt/ros/noetic",
            "PKG_CONFIG_PATH": "/opt/ros/noetic/lib/pkgconfig",
            "PYTHONPATH": "/opt/ros/noetic/lib/python3/dist-packages",
          }
        },
        "command": "catkin_make",
        "args": [
          "-DCMAKE_BUILD_TYPE=Release",
          "-DCMAKE_EXPORT_COMPILE_COMMANDS=1",
        ],
        "problemMatcher": {
          "base": "$gcc",
          "fileLocation": "absolute"
        },
        "group": {
          "kind": "build",
          "isDefault": true
        }
      }
    ]
  }
tmux Dashboard
tmux has already been mentioned in this post, and I’d like to delve into how I utilize it for development. tmux stands for terminal multiplexer, which essentially means that it allows you to run multiple terminal sessions within a single window. These sessions can be arranged in various layouts, with panes and windows of different sizes and positions. For ROS development, where you often need multiple consoles (e.g. one to launch nodes, another to monitor topic values, and yet another to send commands), tmux proves to be invaluable because it allows you to organize all these consoles on a single screen.
Another highly beneficial feature of tmux is its ability to work with sessions that remain active even when no one is attached to them. This means that if a command is running inside a tmux session, it will continue to operate and output to STDOUT even after you’ve detached from it. Reattaching to the session later will present everything exactly as you left it.
The concept I aimed to implement was akin to a console dashboard. Upon attaching to this tmux session, a user should immediately see some basic information about the environment and the robot, with everything set up for robot control.
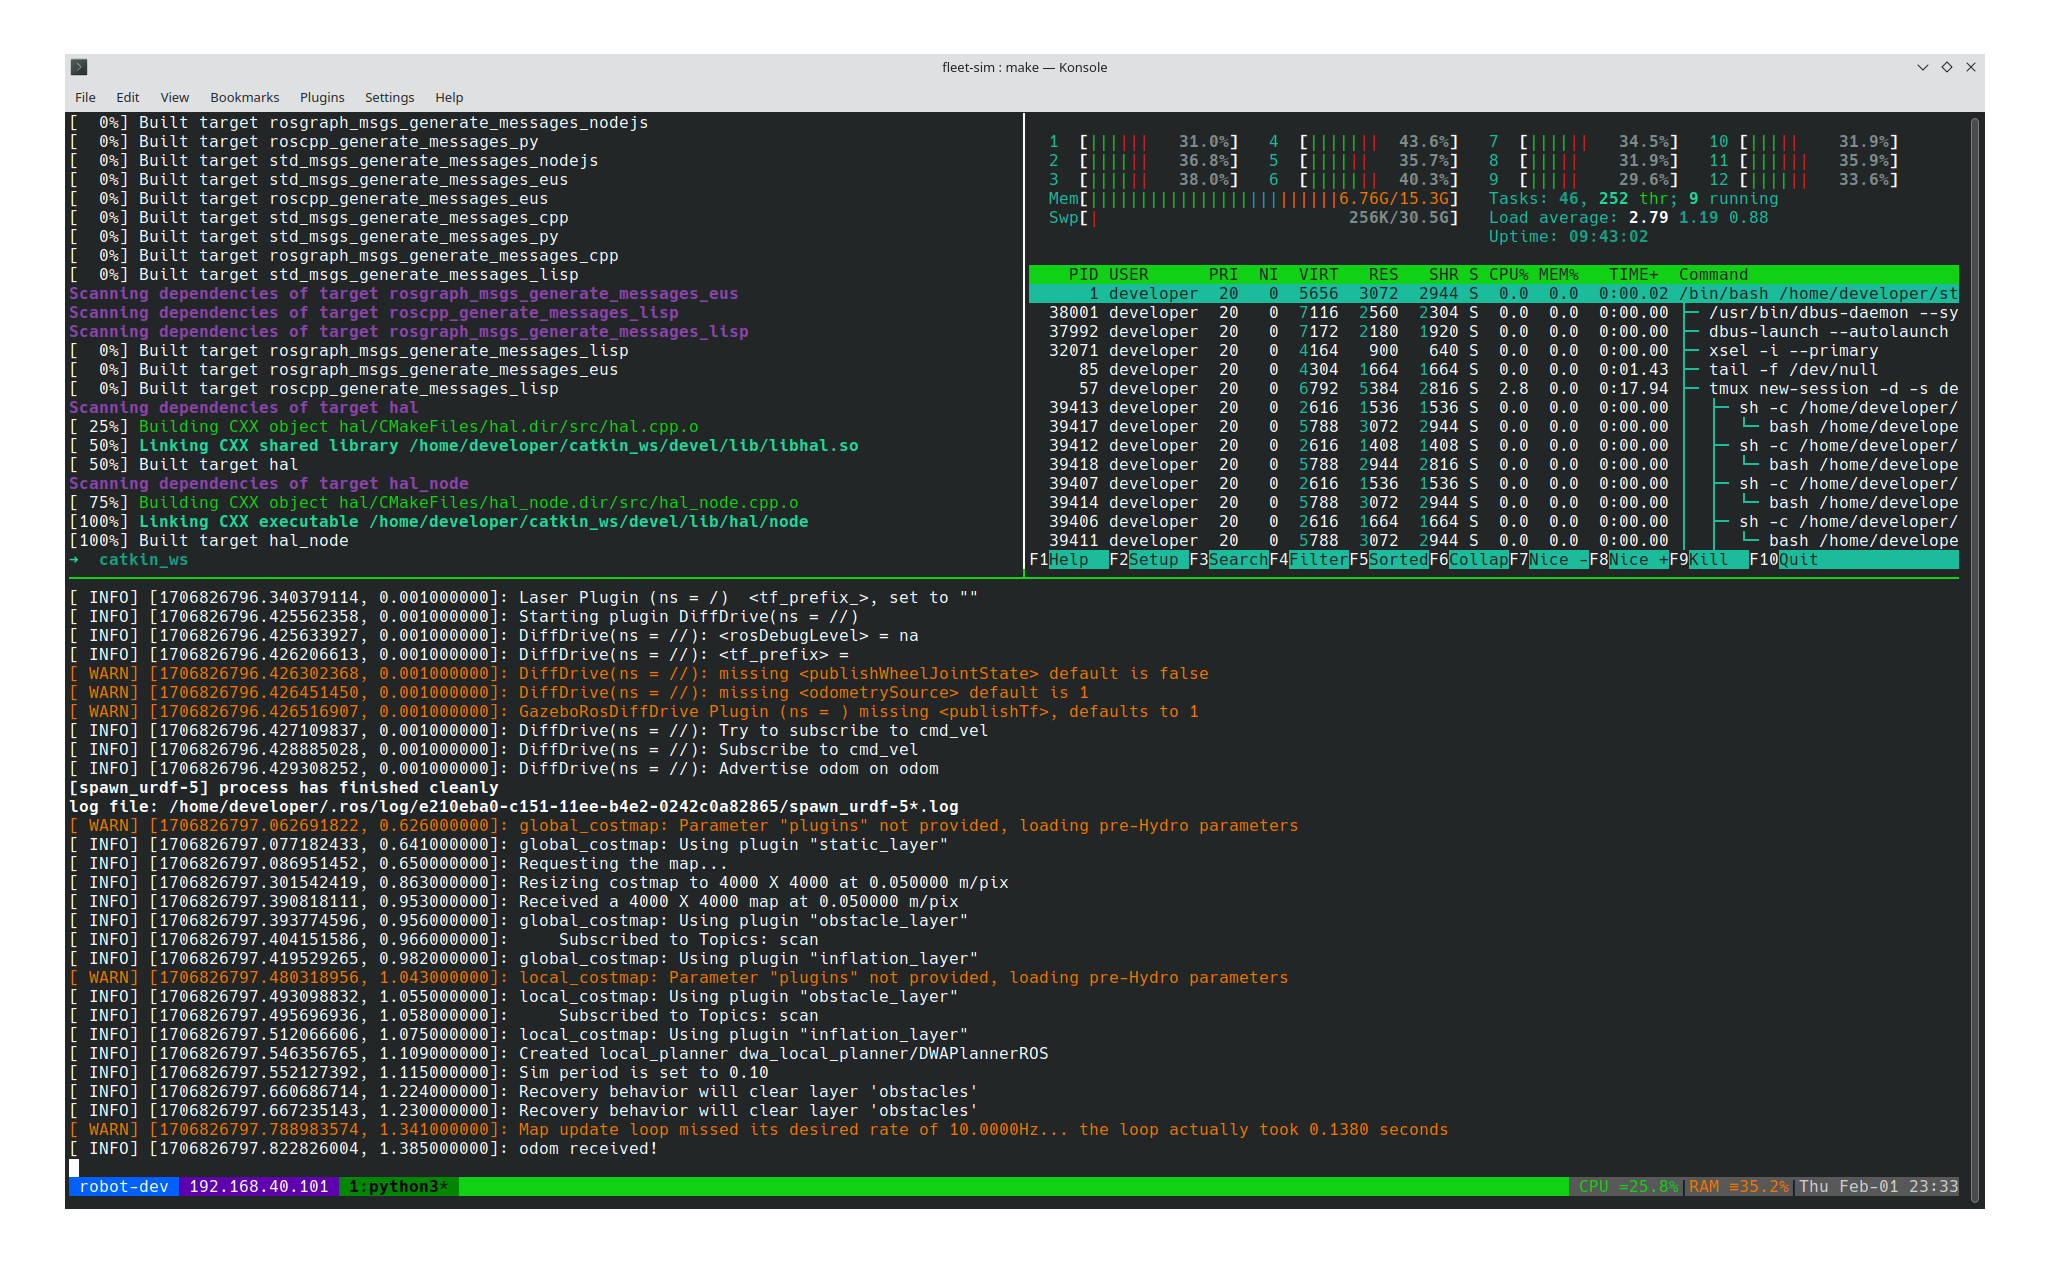 Attached tmux session in robot container
A default tmux session is initiated as soon as the container starts, triggered by the script docker/robot/content/start_tmux_session.sh. Initially, it features three empty panes, but the plan is to have it also kickstart the robot backend. This way, once a user attaches to the session, they’ll be greeted with all console outputs as if they had initiated the processes themselves.
I’ve also incorporated some useful information into the bottom status bar, such as the container name and its IP address. When working with multiple robots, it’s easy to get mixed up about which console belongs to which robot. Having this information constantly displayed helps keep track of each robot’s identity and IP address. Additionally, CPU and RAM usage are shown on the right side of the status bar. All these details are configured via the docker/robot/content/tmux.conf config file, which is copied into the container’s home directory.
Conclusion
I haven’t gone through every file and aspect related to development, but I hope I’ve managed to describe the process of how a Docker container is created and how it’s utilized in conjunction with VSCode. Finally, the tmux dashboard should serve as the main command-line interface for operating and developing the robot. In my next post, I’m going to describe how to bring the robot to life (or at least achieve some kind of autonomous movement).